Authors:
- Mahyar Samani
Tutorial: Run PARSEC Benchmarks with gem5
Introduction
In this tutorial, we will use gem5art to create a disk image for PARSEC benchmarks (PARSEC) and then run the benchmarks using gem5. PARSEC is mainly designed to represent the applications that require vast amount of shared-memory.
Following are their details:
Kernels:
- canneal: Simulated cache-aware annealing to optimize routing cost of a chip design
- dedup: Next-generation compression with data deduplication
- streamcluster: Online clustering of an input stream
Pseudo Applications:
- blackscholes: Option pricing with Black-Scholes Partial Differential Equation (PDE)
- bodytrack: Body tracking of a person
- facesim: Simulates the motions of a human face
- ferret: Content similarity search server
- fluidanimate: Fluid dynamics for animation purposes with Smoothed Particle Hydrodynamics (SPH) method
- freqmine: Frequent itemset mining
- raytrace: Real-time raytracing
- swaptions: Pricing of a portfolio of swaptions
- vips: Image processing (Project Website)
- x264: H.264 video encoding (Project Website)
There are different sizes for possible inputs to each workload. Each size is explained below:
- test: very small set of inputs just to test the functionality of the program.
- simdev: small set of inputs intended to generate general behaviour of each program. Mainly used for simulators and development.
- simsmall, simmedium, simlarge: variable size inputs appropriate for testing microarchitectures with simulators.
- native: very large set of inputs intended for native execution.
This tutorial follows the following directory structure (inside the main directory):
- configs-parsec-tests: gem5 run and configuration scripts to run PARSEC
- disk-image: contains packer script and template files used to build a disk image. The built disk image will be stored in the same folder
- gem5: gem5 source code and the compiled binary
- linux-stable: linux kernel source code used for full-system experiments
- config.4.19.83: linux kernel config file used for its compilation
- results: directory to store the results of the experiments (generated once gem5 jobs are executed)
- launch_parsec_tests.py: gem5 jobs launch script (creates all of the needed artifacts as well)
Setting up the environment
First, we need to create the main directory named parsec-tests (from where we will run everything) and turn it into a git repository. Through the use of parsec-tests git repo, we will try to keep track of changes in those files which are not included in any git repo otherwise. An example of such files is gem5 run and config scripts (config-parsec-tests). We want to make sure that we can keep record of any changes in these scripts, so that a particular run of PARSEC benchmarks can be associated with a particular snapshot of these files. We also need to add a git remote to this repo pointing to a remote location where we want this repo to be hosted.
mkdir parsec-tests
cd parsec-tests
git init
git remote add origin https://your-remote-add/parsec-tests.git
We also need to add a .gitignore file in our git repo, to avoid tracking those files which are not important or will be tracked through other git repos:
*.pyc
m5out
.vscode
results
venv
disk-image/packer
disk-image/packer_1.4.3_linux_amd64.zip
disk-image/parsec/parsec-image/parsec
disk-image/parsec/
disk-image/parsec-benchmark/
disk-image/packer_cache
gem5
linux-stable/
gem5art relies on Python 3, so we suggest creating a virtual environment before using gem5art.
virtualenv -p python3 venv
source venv/bin/activate
gem5art can be installed (if not already) using pip:
pip install gem5art-artifact gem5art-run gem5art-tasks
Creating a disk image
First create a disk-image folder where we will keep all disk image related files:
mkdir disk-image
We will follow the similar directory structure as discussed in Disk Images section. Add a folder named shared for config files which will be shared among all disk images (and will be kept to their defaults) and one folder named parsec which will contain files configured for PARSEC disk image. Add preseed.cfg and serial-getty@.service in shared/.
In parsec/ we will add the benchmark source first, which will eventually be transferred to the disk image through our parsec.json file.
cd disk-image/parsec-benchmark
git clone https://github.com/darchr/parsec-benchmark.git
This source of PARSEC has ROI (region of interest) annotations for each benchmark which will be used by gem5 to separate out simulation statistics of the important parts of a program from the rest of the program. Basically, gem5 magic instructions are used before and after the ROI which exit the guest and transfer control to gem5 run script which can then do things like dumping or resetting stats or switching to cpu of interest.
Next, we will add few other files in parsec/ which will be used for compilation of PARSEC inside the disk image and eventually running of these benchmarks with gem5. These files will be moved from host to the disk image using parsec.json file as we will soon see.
First, create a file parsec-install.sh, which will be executed inside the disk image (once it is built) and will install PARSEC on the disk image:
# install build-essential (gcc and g++ included) and gfortran

#Compile PARSEC

cd /home/gem5/
su gem5
echo "12345" | sudo -S apt update

# Allowing services to restart while updating some
# libraries.
sudo apt install -y debconf-utils
sudo debconf-get-selections | grep restart-without-asking > libs.txt
sed -i 's/false/true/g' libs.txt
while read line; do echo $line | sudo debconf-set-selections; done < libs.txt
sudo rm libs.txt
##

# Installing packages needed to build PARSEC
sudo apt install -y build-essential
sudo apt install -y m4
sudo apt install -y git
sudo apt install -y python
sudo apt install -y python-dev
sudo apt install -y gettext
sudo apt install -y libx11-dev
sudo apt install -y libxext-dev
sudo apt install -y xorg-dev
sudo apt install -y unzip
sudo apt install -y texinfo
sudo apt install -y freeglut3-dev
##

# Building PARSEC

echo "12345" | sudo -S chown gem5 -R parsec-benchmark/
echo "12345" | sudo -S chgrp gem5 -R parsec-benchmark/
cd parsec-benchmark
./install.sh
./get-inputs
cd ..
echo "12345" | sudo -S chown gem5 -R parsec-benchmark/
echo "12345" | sudo -S chgrp gem5 -R parsec-benchmark/
##
In parsec/, create a file post-installation.sh and add following lines to it:
#!/bin/bash
echo 'Post Installation Started'

mv /home/gem5/serial-getty@.service /lib/systemd/system/

mv /home/gem5/m5 /sbin
ln -s /sbin/m5 /sbin/gem5

# copy and run outside (host) script after booting
cat /home/gem5/runscript.sh >> /root/.bashrc

echo 'Post Installation Done'
This post-installation.sh script (which is a script to run after Ubuntu is installed on the disk image) installs m5 and copies the contents of runscript.sh to .bashrc. Therefore, we need to add those things in runscript.sh which we want to execute as soon as the system boots up. Create runscript.sh in parsec/ and add following lines to it:
#!/bin/sh

m5 readfile > script.sh
if [ -s script.sh ]; then
    # if the file is not empty, execute it
    chmod +x script.sh
    ./script.sh
    m5 exit
fi
# otherwise, drop to the terminal
runscript.sh uses m5 readfile to read the contents of a script which is how gem5 passes scripts to the simulated system from the host system. The passed script will then be executed and will be responsible for running benchmark/s which we will look into more later.
Finally, create parsec.json and add following contents:
{
    "builders":
    [
        {
            "type": "qemu",
            "format": "raw",
            "accelerator": "kvm",
            "boot_command":
            [
                "{{ user `boot_command_prefix` }}",
                "debian-installer={{ user `locale` }} auto locale={{ user `locale` }} kbd-chooser/method=us ",
                "file=/floppy/{{ user `preseed` }} ",
                "fb=false debconf/frontend=noninteractive ",
                "hostname={{ user `hostname` }} ",
                "/install/vmlinuz noapic ",
                "initrd=/install/initrd.gz ",
                "keyboard-configuration/modelcode=SKIP keyboard-configuration/layout=USA ",
                "keyboard-configuration/variant=USA console-setup/ask_detect=false ",
                "passwd/user-fullname={{ user `ssh_fullname` }} ",
                "passwd/user-password={{ user `ssh_password` }} ",
                "passwd/user-password-again={{ user `ssh_password` }} ",
                "passwd/username={{ user `ssh_username` }} ",
                "-- <enter>"
            ],
            "cpus": "{{ user `vm_cpus`}}",
            "disk_size": "{{ user `image_size` }}",
            "floppy_files":
            [
                "shared/{{ user `preseed` }}"
            ],
            "headless": "{{ user `headless` }}",
            "http_directory": "shared/",
            "iso_checksum": "{{ user `iso_checksum` }}",
            "iso_checksum_type": "{{ user `iso_checksum_type` }}",
            "iso_urls": [ "{{ user `iso_url` }}" ],
            "memory": "{{ user `vm_memory`}}",
            "output_directory": "parsec/{{ user `image_name` }}-image",
            "qemuargs":
            [
                [ "-cpu", "host" ],
                [ "-display", "none" ]
            ],
            "qemu_binary":"/usr/bin/qemu-system-x86_64",
            "shutdown_command": "echo '{{ user `ssh_password` }}'|sudo -S shutdown -P now",
            "ssh_password": "{{ user `ssh_password` }}",
            "ssh_username": "{{ user `ssh_username` }}",
            "ssh_wait_timeout": "60m",
            "vm_name": "{{ user `image_name` }}"
        }
    ],
    "provisioners":
    [
        {
            "type": "file",
            "source": "../gem5/util/m5/m5",
            "destination": "/home/gem5/"
        },
        {
            "type": "file",
            "source": "shared/serial-getty@.service",
            "destination": "/home/gem5/"
        },
        {
            "type": "file",
            "source": "parsec/runscript.sh",
            "destination": "/home/gem5/"
        },
        {
            "type": "file",
            "source": "parsec/parsec-benchmark/",
            "destination": "/home/gem5/"
        },
        {
            "type": "shell",
            "execute_command": "echo '{{ user `ssh_password` }}' | {{.Vars}} sudo -E -S bash '{{.Path}}'",
            "scripts":
            [
                "parsce/post-installation.sh",
                "parsec/parsec-install.sh"
            ]
        }
    ],
    "variables":
    {
        "boot_command_prefix": "<enter><wait><f6><esc><bs><bs><bs><bs><bs><bs><bs><bs><bs><bs><bs><bs><bs><bs><bs><bs><bs><bs><bs><bs><bs><bs><bs><bs><bs><bs><bs><bs><bs><bs><bs><bs><bs><bs><bs><bs><bs><bs><bs><bs><bs><bs><bs><bs><bs><bs><bs><bs><bs><bs><bs><bs><bs><bs><bs><bs><bs><bs><bs><bs><bs><bs><bs><bs><bs><bs><bs><bs><bs><bs><bs><bs><bs><bs><bs><bs><bs><bs><bs><bs><bs><bs><bs><bs><bs><bs>",
        "desktop": "false",
        "image_size": "12000",
        "headless": "true",
        "iso_checksum": "34416ff83179728d54583bf3f18d42d2",
        "iso_checksum_type": "md5",
        "iso_name": "ubuntu-18.04.2-server-amd64.iso",
        "iso_url": "http://old-releases.ubuntu.com/releases/18.04.2/ubuntu-18.04.2-server-amd64.iso",
        "locale": "en_US",
        "preseed" : "preseed.cfg",
        "hostname": "gem5",
        "ssh_fullname": "gem5",
        "ssh_password": "12345",
        "ssh_username": "gem5",
        "vm_cpus": "16",
        "vm_memory": "8192",
        "image_name": "parsec"
  }

}
parsec.json is our primary .json configuration file. The provisioners and variables section of this file configure the files that need to be transferred to the disk and other things like disk image’s name.
Next, download packer (if not already downloaded) in the disk-image folder:
cd disk-image/
wget https://releases.hashicorp.com/packer/1.4.3/packer_1.4.3_linux_amd64.zip
unzip packer_1.4.3_linux_amd64.zip
Now, to build the disk image inside the disk-image folder, run:
./packer validate parsec/parsec.json

./packer build parsec/parsec.json
gem5 run scripts
Next, we need to add gem5 run scripts. We will do that in a folder named configs-parsec-tests. Get the run script named run_parsec.py from here, and other system configuration files from here. The run script (run_parsec.py) takes the following arguments:
- kernel: compiled kernel to be used for simulation
- disk: built disk image to be used for simulation
- cpu: the cpu model to use (e.g. kvm or atomic)
- benchmark: PARSEC workload to run (e.g. blackscholes, bodytrack, facesim, etc.)
- num_cpus: number of parallel cpus to be simulated
Database and Celery Server
To create a database and start a celery server follow the instructions here.
Creating a launch script
Finally, we will create a launch script with the name launch_parsec_tests.py, which will be responsible for registering the artifacts to be used and then launching gem5 jobs.
The first thing to do in the launch script is to import required modules and classes:
import os
import sys
from uuid import UUID

from gem5art.artifact import Artifact
from gem5art.run import gem5Run
from gem5art.tasks.tasks import run_gem5_instance
Next, we will register artifacts. For example, to register packer artifact we will add the following lines:
packer = Artifact.registerArtifact(
    command = '''wget https://releases.hashicorp.com/packer/1.4.3/packer_1.4.3_linux_amd64.zip;
    unzip packer_1.4.3_linux_amd64.zip;
    ''',
    typ = 'binary',
    name = 'packer',
    path =  'disk-image/packer',
    cwd = 'disk-image',
    documentation = 'Program to build disk images. Downloaded sometime in August from hashicorp.'
)
For our parsec-tests repo,
experiments_repo = Artifact.registerArtifact(
    command = 'git clone https://your-remote-add/parsec-tests.git',
    typ = 'git repo',
    name = 'parsec-tests',
    path =  './',
    cwd = '../',
    documentation = 'main repo to run parsec with gem5'
)
Note that the name of the artifact (returned by the registerArtifact method) is totally up to the user as well as most of the other attributes of these artifacts.
For all other artifacts, add following lines in launch_parsec_tests.py:
parsec_repo = Artifact.registerArtifact(
    command = '''mkdir parsec-benchmark/;
    cd parsec-benchmark;
    git clone https://github.com/darchr/parsec-benchmark.git;''',
    typ = 'git repo',
    name = 'parsec_repo',
    path =  './disk-image/parsec-benchmark/parsec-benchmark/',
    cwd = './disk-image/',
    documentation = 'main repo to copy parsec source to the disk-image'
)

gem5_repo = Artifact.registerArtifact(
    command = '''
        git clone https://gem5.googlesource.com/public/gem5;
        cd gem5;
        git remote add darchr https://github.com/darchr/gem5;
        git fetch darchr;
        git cherry-pick 6450aaa7ca9e3040fb9eecf69c51a01884ac370c;
        git cherry-pick 3403665994b55f664f4edfc9074650aaa7ddcd2c;
    ''',
    typ = 'git repo',
    name = 'gem5',
    path =  'gem5/',
    cwd = './',
    documentation = 'cloned gem5 master branch from googlesource (Nov 18, 2019) and cherry-picked 2 commits from darchr/gem5'
)

m5_binary = Artifact.registerArtifact(
    command = 'make -f Makefile.x86',
    typ = 'binary',
    name = 'm5',
    path =  'gem5/util/m5/m5',
    cwd = 'gem5/util/m5',
    inputs = [gem5_repo,],
    documentation = 'm5 utility'
)

disk_image = Artifact.registerArtifact(
    command = './packer build parsec/parsec.json',
    typ = 'disk image',
    name = 'parsec',
    cwd = 'disk-image',
    path = 'disk-image/parsec/parsec-image/parsec',
    inputs = [packer, experiments_repo, m5_binary, parsec_repo,],
    documentation = 'Ubuntu with m5 binary and PARSEC installed.'
)

gem5_binary = Artifact.registerArtifact(
    command = 'scons build/X86/gem5.opt',
    typ = 'gem5 binary',
    name = 'gem5',
    cwd = 'gem5/',
    path =  'gem5/build/X86/gem5.opt',
    inputs = [gem5_repo,],
    documentation = 'gem5 binary'
)

linux_repo = Artifact.registerArtifact(
    command = '''git clone --branch v4.19.83 --depth 1 https://git.kernel.org/pub/scm/linux/kernel/git/stable/linux.git;
    mv linux linux-stable''',
    typ = 'git repo',
    name = 'linux-stable',
    path =  'linux-stable/',
    cwd = './',
    documentation = 'linux kernel source code repo'
)

linux_binary = Artifact.registerArtifact(
    name = 'vmlinux-4.19.83',
    typ = 'kernel',
    path = 'linux-stable/vmlinux-4.19.83',
    cwd = 'linux-stable/',
    command = '''
    cp ../config.4.19.83 .config;
    make -j8;
    cp vmlinux vmlinux-4.19.83;
    ''',
    inputs = [experiments_repo, linux_repo,],
    documentation = "kernel binary for v4.19.83"
)
Once, all of the artifacts are registered, the next step is to launch all gem5 jobs. To do that, add the following lines in your script:
if __name__ == "__main__":
    num_cpus = ['1']
    benchmarks = ['blackscholes', 'bodytrack', 'canneal', 'dedup','facesim', 'ferret', 'fluidanimate', 'freqmine', 'raytrace', 'streamcluster', 'swaptions', 'vips', 'x264']

    sizes = ['simsmall', 'simlarge', 'native']
    cpus = ['kvm', 'timing']

    for cpu in cpus:
        for num_cpu in num_cpus:
            for size in sizes:
                if cpu == 'timing' and size != 'simsmall':
                    continue
                for bm in benchmarks:
                    run = gem5Run.createFSRun(
                        'parsec_tests',
                        'gem5/build/X86/gem5.opt',
                        'configs-parsec-tests/run_parsec.py',
                        f'''results/run_parsec/{bm}/{size}/{cpu}/{num_cpu}''',
                        gem5_binary, gem5_repo, experiments_repo,
                        'linux-stable/vmlinux-4.19.83',
                        'disk-image/parsec/parsec-image/parsec',
                        linux_binary, disk_image,
                        cpu, bm, size, num_cpu,
                        timeout = 24*60*60 #24 hours
                        )
                    run_gem5_instance.apply_async((run, os.getcwd(), ))
The above lines are responsible for looping through all possible combinations of variables involved in this experiment. For each combination, a gem5Run object is created and eventually passed to run_gem5_instance to be executed asynchronously using Celery. Note that when using timingSimpleCPU model only size simsmall has been used because the other sizes take more than 24 hours to simulate.
Finally, make sure you are in python virtual env and then run the script:
python launch_parsec_tests.py
Results
Once you run the launch script, the declared artifacts will be registered by gem5art and stored in the database. Celery will run as many jobs in parallel as allowed by the user (at the time of starting the server). As soon as a gem5 job finishes, a compressed version of the results will be stored in the database as well. User can also query the database using the methods discussed in the Artifacts, Runs sections and boot-test tutorial previously.
Here is the status of each workload after simulation:
 WorkingStatusKVM
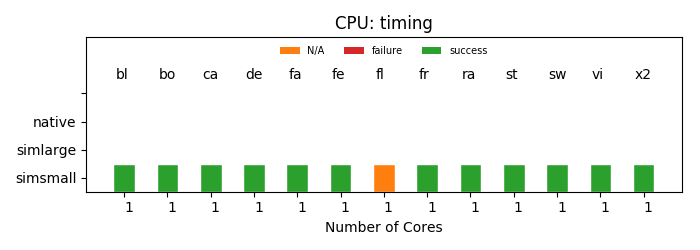 WorkingStatusTiming
Below are the simulation time for KVM and TimingSimple cpu models.
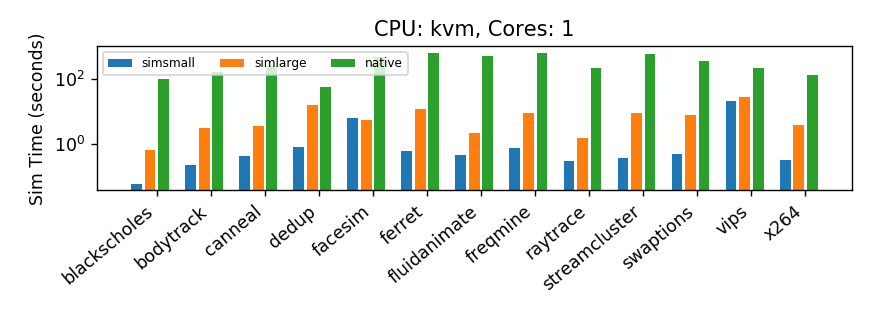 SimTimeKVM
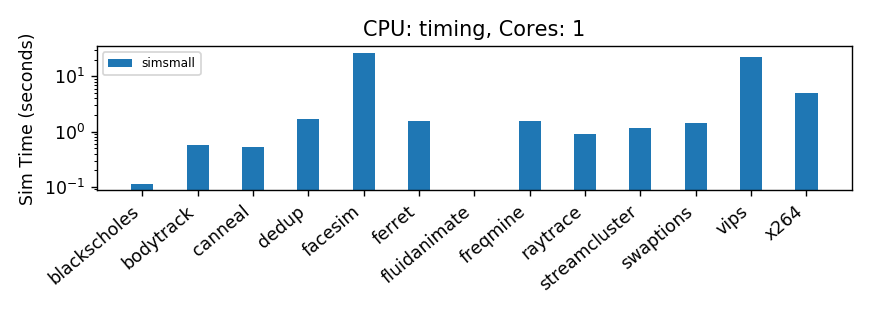 SimTimeTiming
The number of instructions run on each cpu model is shown below:
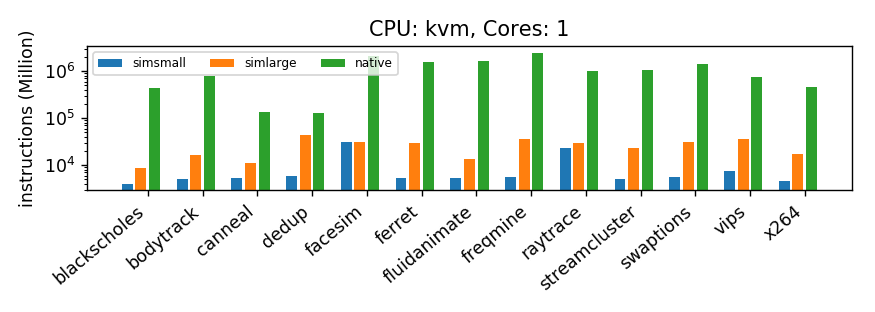 InstCountKVM
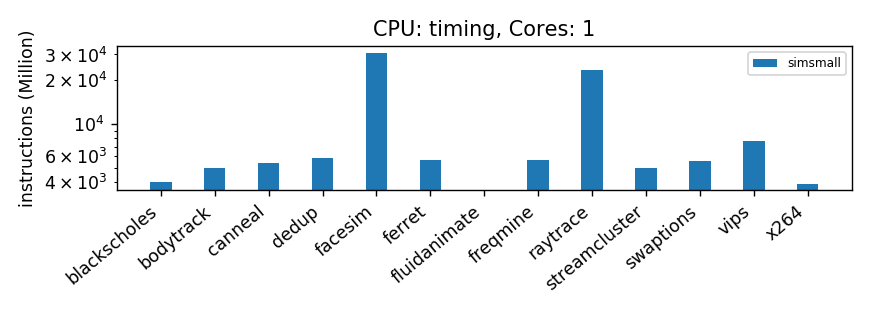 InstCountTiming
